












 Tobias Weltner
 Aleksandar Nikolić
In this second part of the series, we’ll separate the UI from the data. This allows you to build elegant and powerful UI dashboards with just a few lines of code, while leveraging web services to provide the necessary data.
As you’ll see at the end, this approach offers enormous flexibility and lets you tackle challenges with ease—challenges that would typically cause a lot of headaches.
Quick recap: PSU apps
If you followed part 1, you’ll immediately appreciate the first significant advantage that PowerShell Universal provides: it acts as a management system and repository for your code, allowing you to easily reuse previous work.
For example, the “service list” we created in part 1 is still available in PSU. Whenever you need more information about your services, you can access it via the main PSU dashboard:
- Click Apps in the left-hand vertical menu bar.
- You will see all your apps. Locate the “Service Dashboard” created in part 1.
- Click the globe icon to open the app. It will display your services along with the additional details we implemented, such as Service Group Name and the underlying process name.
Remember that every PSU app is directly accessible via its unique URL, so you can open it by navigating to its link, for example: http://localhost:5000/list-services/Home
Building an action dashboard
We’ll build a central dashboard with navigation buttons. Like anything with a UI, dashboards are just PSU Apps, so we’ll start where we left off last time:
- Click “Apps” in the main vertical menu on the left, then click the child item “Apps.” You will now see a list of your existing apps.
- Click the blue “Create App” button at the top to add a new app. Choose “Dashboard1” as the name and enter “dashboard1” as the URL. Then click OK.
- Click the pencil icon to open the code editor. Replace sample code with the following code:
# use a scriptblock to save the different pages to one variable

$Pages = & {

  # FIRST PAGE (root page) defines your cockpit with all of your buttons

  New-UDPage -Name 'Home' -Url '/' -Content {

    # add a small header:

    New-UDTypography -Text 'My personal Dashboard' -Variant h6

    # add three buttons

    New-UDButton -Text 'Services' -OnClick {

      # tell the button what to do when clicked

      # use -Native to open an external app (URL is relative to PSU root)

      Invoke-UDRedirect '/list-services' -Native

    }

    New-UDButton -Text 'Processes' -OnClick {

      # tell the button what to do when clicked

      # DO NOT use -Native to open a child page within this app (URL is relative to this app)

      Invoke-UDRedirect '/list-processes'

    }

    # third button, same as before

    New-UDButton -Text 'Something else' -OnClick {

      Invoke-UDRedirect '/list-more'

    }

  }


  # add as many CHILD PAGES as you need. Their URL is relative to the root URL of this app

  New-UDPage -Name 'Processes' -Url '/list-processes' -Content {

    New-UDTypography -Text 'Here you could implement your own code to display something more useful.'

  }


  New-UDPage -Name 'More' -Url '/list-more' -Content {

    New-UDTypography -Text 'Here you could implement your own code to display something more useful.'

  }

}

New-UDApp -Title 'My Cockpit' -Pages $Pages- Click the Save icon (with the diskette symbol). This step is crucial: you must save any edits manually, otherwise PSU will ignore your changes.
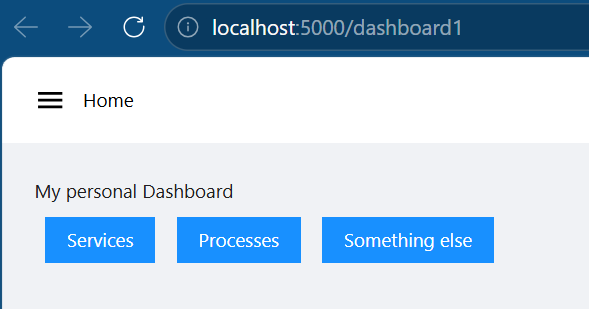
- Click the “View App” button to run it. You will now see your dashboard UI, which consists of three buttons and an automatically generated hamburger menu in the top-left corner.
This example illustrates a few core concepts, so let’s first explore the interface and then look at the details:
- When you click “Services,” you will see the service list app we created in part 1. If you encounter an error message, you may have skipped part 1, so the app that lists services does not exist.
- When you click “Processes” or “Something else,” you navigate to pages that are part of your dashboard app. These pages are not populated with meaningful content yet.
Calling external apps
The “Services” button demonstrates how you can embed external apps in your dashboard. By using Invoke-UDRedirect '/list-services' with the -Native switch, you can specify URLs relative to the main PSU root and access any other app you created earlier.
While it is possible to incorporate external apps this way, it is not considered good practice because it comes at a cost: you lose automatic navigation. The hamburger menu in the top-left corner is no longer available in the external app. This is expected, since you are effectively navigating to a completely different app.
Calling child pages
The other two buttons work differently: they navigate to child pages of the dashboard app. They use the same UDRedirect cmdlet but without the -Native switch, so the URL refers to an internal child page created within your dashboard using New-UDPage.
Because these child pages are part of your dashboard app, automatic navigation works as expected, and the hamburger menu remains visible regardless of which page is currently displayed.
Since you define these child pages within your dashboard app, you have full control and can easily add UI features in a consistent way—for example, by adding a more prominent “Back to Home” button.
Here is an example. Simply replace your code (and don’t forget to click the Save button before viewing the app):
function New-CockpitBackBar {

    New-UDStack -Direction row -Spacing 2 -Children {

        New-UDButton -Text '← Home' -OnClick {

            Invoke-UDRedirect '/'

        }

    }

}

# use a scriptblock to save the different pages to one variable

$Pages = & {

  # FIRST PAGE (root page) defines your cockpit with all of your buttons

  New-UDPage -Name 'Home' -Url '/' -Content {

    # add a small header

    New-UDTypography -Text 'My personal Dashboard' -Variant h6

    # add three buttons

    New-UDButton -Text 'Services' -OnClick {

      # tell the button what to do when clicked

      # use -Native to open an external app (URL is relative to PSU root)

      Invoke-UDRedirect '/list-services' -Native

    }

    New-UDButton -Text 'Processes' -OnClick {

      # tell the button what to do when clicked

      # DO NOT use -Native to open a child page within this app (URL is relative to this app)

      Invoke-UDRedirect '/list-processes'

    }

    # third button, same as before

    New-UDButton -Text 'Something else' -OnClick {

      Invoke-UDRedirect '/list-more'

    }

  }


  # add as many CHILD PAGES as you need. Their URL is relative to the root URL of this app

  New-UDPage -Name 'Processes' -Url '/list-processes' -Content {

    New-CockpitBackBar

    New-UDTypography -Text 'Here you could implement your own code to display something more useful.'

  }


  New-UDPage -Name 'More' -Url '/list-more' -Content {

    New-CockpitBackBar

    New-UDTypography -Text 'Here you could implement your own code to display something more useful.'

  }

}

New-UDApp -Title 'My Cockpit' -Pages $Pages
Now, on the child pages, you’ll find a “Home” button that conveniently takes you back to the dashboard root.
What about code reuse?
Using child pages comes with trade-offs: you cannot reuse the work you invested in previous apps. For child pages to display useful content, you need to add the appropriate code yourself.
This leads us to better design strategies. In part 1, we invested effort in creating comprehensive service lists and implemented them as a single app. The app worked as expected, but as you can see now, it is not reusable. A better approach would have been to separate data and UI into distinct components—and that’s exactly what we’re going to do today.
In part 1, we introduced PSU apps as the UI (presentation) layer. To complete the picture, we will now introduce PSU endpoints as the data layer.
Creating an endpoint (aka Web service)
To make the service list information we developed in part 1 truly reusable, we should have implemented it as a web service instead of an app. Let’s fix that now:
- In the vertical PSU dashboard menu, click “APIs”, then click “Endpoints.” You will now see all of your self-defined web services (initially there are none). Click “Create Endpoint.”
- In the “URL” field, enter
get-service, then click OK. The web service will appear in the list. - Click the pencil icon to open the code editor. You can now cleanly separate UI from data. Here is the raw data code from part 1:
function Get-ServiceProcessId {

    [CmdletBinding()]

    param

    (

        [Parameter(Mandatory, ValueFromPipeline, ParameterSetName='ServiceName')]

        [string]

        $Name,


        [Parameter(Mandatory, ValueFromPipeline, ParameterSetName='ActualService')]

        [System.ServiceProcess.ServiceController]

        $Service,


        [switch]

        $PassThru

    )

    begin

    {

        $hash = Get-CimInstance Win32_Service -ErrorAction Ignore |

        Group-Object -Property Name -AsHashTable -AsString

    }


    process

    {

        # since the user now has the option to either specify the service name

        # or pipe in an actual service, let's look up the pendant so we always

        # have both and can simplify the remaining code

        if ($PSCmdlet.ParameterSetName -eq 'ServiceName')

        {

            $Service = Get-Service -Name $Name -ErrorAction Ignore

        }

        else

        {

            $Name = $Service.Name

        }

        # make sure "0" values are replaced by NULL

        $id = $hash.$Name.ProcessId | Where-Object { $_ -gt 0 }


        if ($PassThru)

        {

            # take the service and add the process ID

            $Service |

            Add-Member -MemberType NoteProperty -Name ProcessId -Value $id -PassThru

        }

        else

        {

            $id

        }

    }

}

# pipe in any object with a property "ProcessId" or "Id", and add a property with

# the actual process name

function Get-ProcessNameById {

    [CmdletBinding()]

    param

    (

        [Parameter(Mandatory, ValueFromPipeline)]

        [Object]

        $InputObject,


        [Parameter(Mandatory, ValueFromPipelineByPropertyName)]

        [int]

        [Alias('Id')]

        $ProcessId,


        [switch]

        $PassThru

    )


    process

    {

        $ProcessName = if ($ProcessId)

        {

            (Get-Process -Id $ProcessId).Name

        }

        if ($PassThru)

        {

            $InputObject |

            Add-Member -MemberType NoteProperty -Name ProcessName -Value $ProcessName -PassThru

        }

        else

        {

            $ProcessName

        }

    }

}

# submit the name of a service, or pipe in services

# adds the "GroupName" property, exposing the name of the service group for

# the given service

function Get-ServiceGroupName

{

    [CmdletBinding()]

    param

    (

        [Parameter(Mandatory, ValueFromPipeline, ParameterSetName='ServiceName')]

        [string]

        $Name,


        [Parameter(Mandatory, ValueFromPipeline, ParameterSetName='ActualService')]

        [System.ServiceProcess.ServiceController]

        $Service,


        [switch]

        $PassThru

    )

    begin

    {

        $hash = Get-CimInstance Win32_Service |

        Group-Object -Property Name -AsHashTable -AsString

    }


    process

    {

        # since the user now has the option to either specify the service name

        # or pipe in an actual service, let's look up the pendant so we always

        # have both and can simplify the remaining code

        if ($PSCmdlet.ParameterSetName -eq 'ServiceName')

        {

            $Service = Get-Service -Name $Name -ErrorAction Ignore

        }

        else

        {

            $Name = $Service.Name

        }

        # get the launch command for this service

        $pathName = $hash.$Name.PathName

        # look if the "-k" parameter was specified, followed by the service group name

        # we are after (uses RegEx)

        $groupName = if($pathName -match '-k\s+(\w+)')

        {

            $matches[1]

        }


        if ($PassThru)

        {

            # take the service and add the process ID

            $Service |

            Add-Member -MemberType NoteProperty -Name GroupName -Value $groupName -PassThru

        }

        else

        {

            $groupName

        }

    }

}

Get-Service -ErrorAction Ignore |

    # ...add the service process ID...

    Get-ServiceProcessId -PassThru |

    # ...take only services that have a process ID...

    Where-Object ProcessId |

    # ...add the process name for the process ID...

    Get-ProcessNameById -PassThru |

    # ...add the service group name so we can differentiate svchost...

    Get-ServiceGroupName -PassThru |

    # ...sort by service displayname...

    Sort-Object -Property DisplayName |

    # select the properties to display in the table

Select-Object -Property DisplayName, Name, ProcessName, GroupName, ProcessId- Click the Save icon. Then, at the top, click “Test.” Next, click “Invoke” on the right side to execute your web service and verify that it works. You should see the service information displayed in JSON format.
By default, the web service you created is secured and requires authentication. We’ll cover authentication and security options separately, so for now we will disable authentication:
- In the list of endpoints in the PSU dashboard, click the gear icon for your web service.
- In the dialog, open the “Security” tab and uncheck “Authentication.” Then click OK.
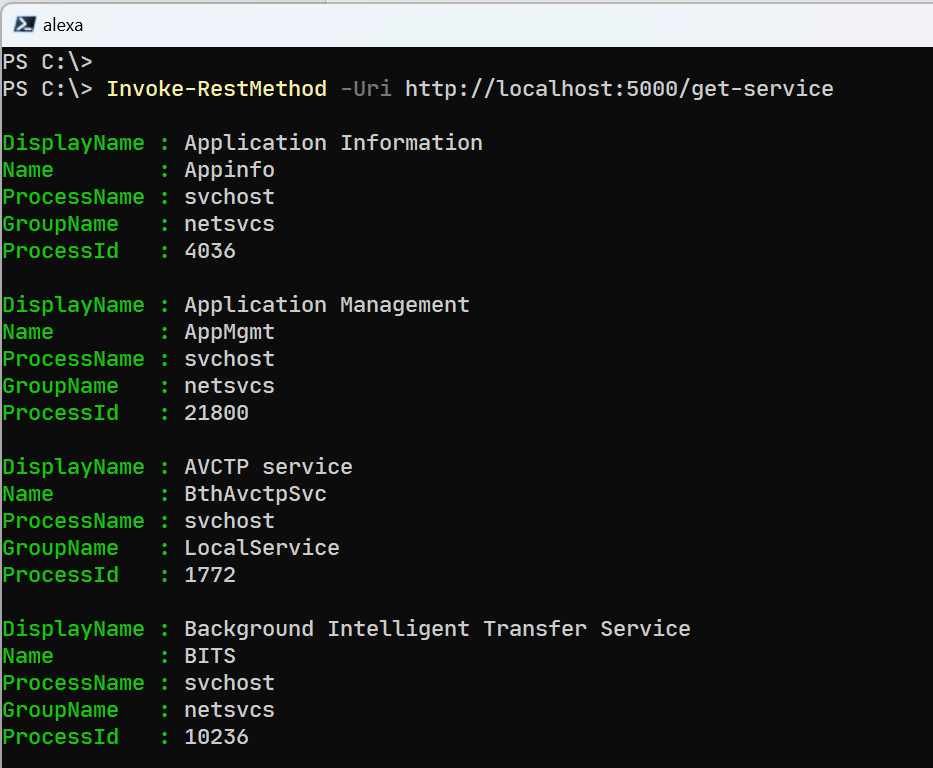
Your web service is now accessible to anyone, including external PowerShell sessions. Let’s test it by opening a regular PowerShell console. Your web service has a unique URL—in our example: http://localhost:5000/get-service. Simply launch any PowerShell console and run:
PS> Invoke-RestMethod -Uri http://localhost:5000/get-serviceThe web service returns the data to you—mission accomplished: data and UI are now separated.
Final dashboard version
Now that you know how to clearly separate data from UI, we can revisit our dashboard app and focus entirely on the UI. We no longer rely on external apps; instead, we keep everything UI-focused.
- In the main PSU dashboard menu, click “Apps,” then click the “Apps” submenu. On the right, you will see your PSU apps.
- Click the pencil icon in your “Dashboard1” app to open the code. Replace it with the new code, then click the Save icon.
function New-CockpitBackBar {

    New-UDStack -Direction row -Spacing 2 -Children {

        New-UDButton -Text '← Home' -OnClick {

            Invoke-UDRedirect '/'

        }

    }

}

$Pages = & {

  New-UDPage -Name 'Home' -Url '/' -Content {

    New-UDTypography -Text 'My personal Dashboard' -Variant h6

    New-UDButton -Text 'Services' -OnClick {

      # do NOT go to a separate App, handle everything WITHIN this App (do NOT use -Native)

      Invoke-UDRedirect '/list-services'

    }

    New-UDButton -Text 'Processes' -OnClick {

      Invoke-UDRedirect '/list-processes'

    }

    New-UDButton -Text 'Something else' -OnClick {

      Invoke-UDRedirect '/list-more'

    }

  }


  # handle service list in a CHILD PAGE

  New-UDPage -Name 'Services' -Url '/list-services' -Content {

    New-CockpitBackBar


    # get the data from a web service (reusable, modular, flexible)

    $data = Invoke-RestMethod -Uri http://localhost:5000/get-service

    New-UDTable -Data $data

  }

  New-UDPage -Name 'Processes' -Url '/list-processes' -Content {

    New-CockpitBackBar

    New-UDTypography -Text 'Here you could implement your own code to display something more useful.'

  }


  New-UDPage -Name 'More' -Url '/list-more' -Content {

    New-CockpitBackBar

    New-UDTypography -Text 'Here you could implement your own code to display something more useful.'

  }

}

New-UDApp -Title 'My Cockpit' -Pages $Pages
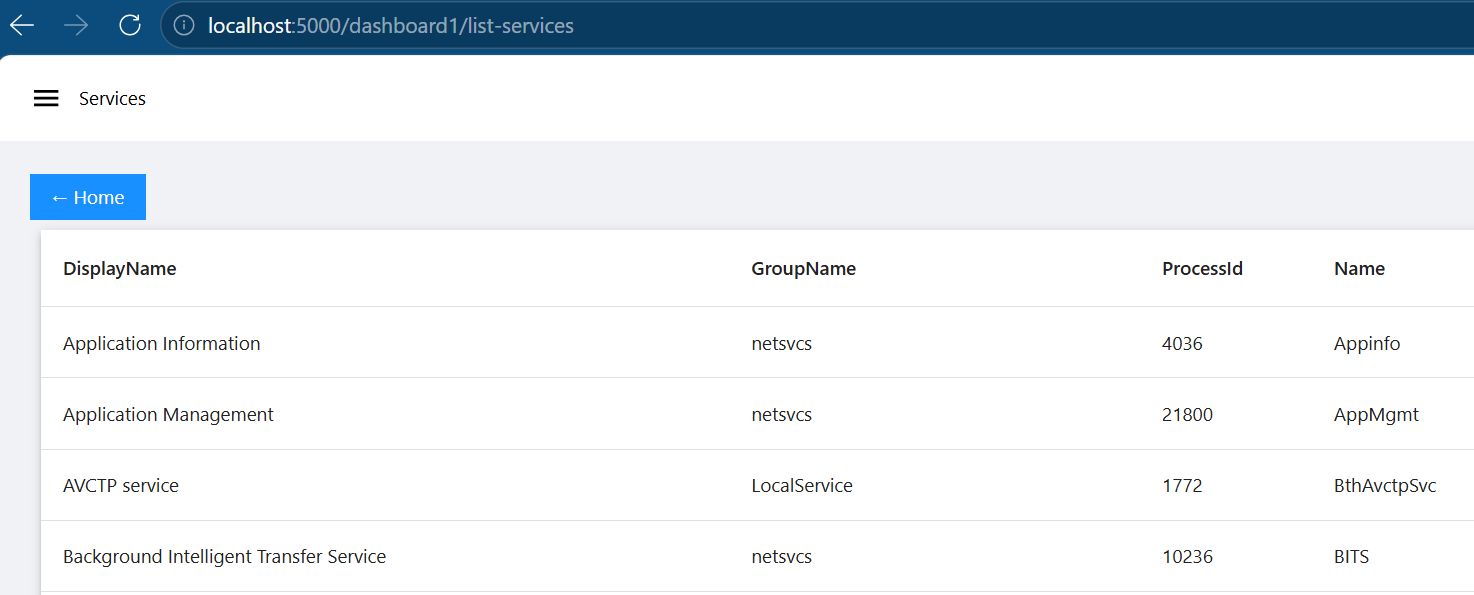
Click “View App” to test-drive this final version. You will see the same three buttons, but this time, when you click “Services,” you seamlessly navigate to a child page displaying the enhanced service list. At that point, the hamburger menu is still available, you have access to the “Home” button, and all the complexity involved in creating the service list is now offloaded to a web service.
Next part
Now that we’ve clarified how to cleanly separate data from UI, you’ve seen two of the main features in PSU: “Apps,” which serve as the presentation layer, and “Endpoints,” which are essentially web services that provide raw data.
In the upcoming parts, we’ll dive deeper into the advantages PSU can offer with this approach:
- For now, we have disabled authentication entirely. In upcoming parts, we’ll explore all your security options:
- how you can run web services under different accounts,
- how to implement privilege escalation, and
- how to allow regular users to invoke privileged tasks without granting them administrator rights or relying on awkward “secrets.”
- For now, we have displayed static data in our UI frontend. In upcoming parts, we’ll look at dynamic UIs that can update themselves as values change, and much more.
Ready to follow along? Download PowerShell Universal.